If you use chimping to set your exposure by looking at the histogram on the rear LCD and ‘sort out white balance’ afterwards rather than metering the light, you really need to be extra careful. One of the oft used phrases in these days if digital photography is ‘If you’re using raw then you can set white balance in post-processing’. ( Although many will incorrectly use the term ‘editing’ instead of post-processing. See footnote. ) How many times have you heard that statement or something similar. ‘Use raw and you can fix it afterwards’. This is very much not the case if you are looking at optimising the technical quality of an image. If you over or under expose and then ‘fix it afterwards’ then you will be adding noise or artefacts and losing contrast. If you overexpose then highlight detail will be lost to blown white and, once it’s gone, it’s gone.
First of all what you see on your un-calibrated, limited gamut LCD screen when chimping is a JPEG thumbnail rendition that is created using your in-camera processing settings. The thumbnail will be in 8 bit colour whereas raw and TIFF files can be 16 bit. There will potentially be more detail in the highlights and shadows in the 16 bit image file which is potentially an advantage. If your in-camera processing settings are a close match to your post-processing then this will not be a problem. However, if in post you decide to do things very differently to your in-camera settings might have hidden a problem.
The second and often overlooked issue of chimping is the impact of having the wrong white balance setting. White balance is so easy to get sorted when you are in a controlled environment but it frequently and lazily gets left to ‘I’ll sort it in post’. If you chimp to set your exposure and you do not set a close to accurate white balance at capture then you are potentially giving yourself big problems. If your light source is strong in the reds, for example tungsten, then your histogram will be higher in the reds than an accurate white balance. If your white balance is set to a cool light source then your histogram can be very misleading. As a result you may think you are over or under exposing but not actually be doing so. When ‘correcting’ what you thought was wrong from looking at the histogram you can end up over or under exposing.
The images below with their histograms help to make the point and probably in a better way than just words. I photographed a red and black backdrop cloth and also a blue cloth lit by a 500 watt tungsten photoflood ( notionally 3200k ). With each of these I went through various white balance setting as indicated.
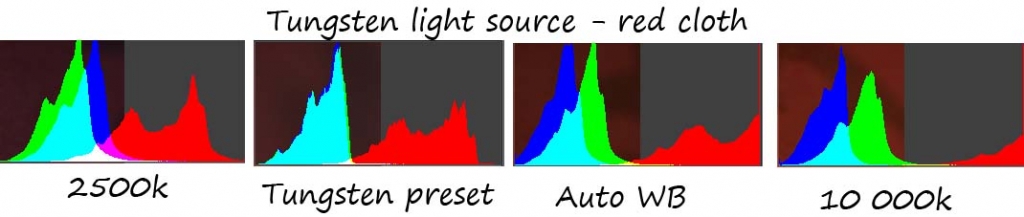
The lowest Kelvin setting for colour temperature that the camera I used will go to is 2500k. This is not far off the camera’s tungsten / incandescent preset although the green and blue separate out. Neither of them push the histogram into showing over-exposure or blocked up shadows. Because both the light source and subject are red auto-whitebalance ( AWB – although whenever I see that I think of the Average White Band, music of my youth and the present ). fails. Reds are pushed into overexposure. Push it up to 10 000k and reds are vastly overexposed. With the red cloth already being strong in reds being bolstered by the ‘red’ tungsten light source.
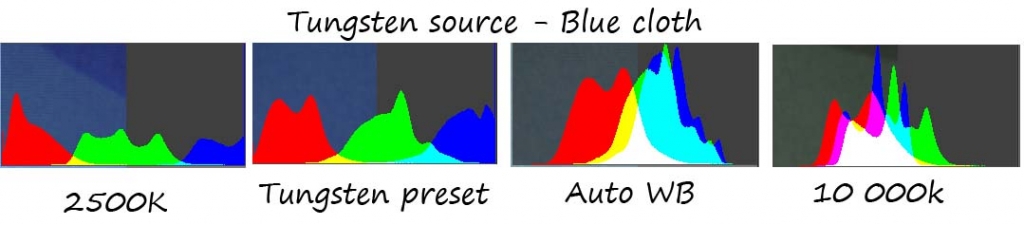
With the blue cloth and warm light source things seem to balance out in Auto-WB. 10 000k is also OK although a little compressed. If you are using the histogram to set your exposure and have this extreme mismatch then you will have problems if you chose to expose to the right or the left. The Tungsten preset that did so well with the red cloth is over exposing the blue and some of the reds will block up ( be underexposed ).
What does this mean ?
Well, if you set the exposure by chimping and are happy to do so despite the flaws in the LCD and biasing by in-camera processing, make sure you set the white balance accurately before you start chimping, If you don’t then you are giving yourself an additional problem.
Lazy technique leads to problems and quality compromises that you will not suffer from if you put a bit of effort in to get your technique basics correct. Control your white balance, meter your exposure and get the best possible starting point for whatever you might then do with the image in your post-processing, post-production and retouching. I know that I do not always ‘get it right’. When I get it wrong I have to decide to either edit out the image or work with a compromised image. If it is for a client I’d rather not show them any compromised images.
NB clarity of language use:
Chimp / chimping – looking at the LCD on a digital camera. Reviewing images whilst you are taking them is chimping and I know that I will do this a lot at weddings and other events in order to check for blinkers. Chimping also refers to when people look at the image on the LCD to make decisions about exposure settings.
Edit
Some of the people who have only been photographers in the Adobe age use the term ‘edit’ as a catch-all for the full sequence of: edit ( selecting the image/s, considering cropping and end-point); post-process; post-produce; retouch and then any comping that might be done. This slang, catch-all use of ‘edit’ is a lack of precision that is either derived from laziness or from ignorance. Some examples. With ‘print onsite’ event photography the customer is doing the editing. They are selecting the image they want printed. The post-processing is done in-camera before the JPEG is sent to the computer. At the end of model / portrait sessions the images are edited into those that are wanted, those that are not and those that are to be binned and never seen again. Then the post-processing and any agreed / required post-production, retouching or transforming into digital art will take place.