What does ‘Getting it right in-camera’ mean ?. Well, as with so many things, it depends on who you ask. One thing that is certain is that digital photography has increased the frequency of the term being used. It has also led to some heated social-media arguments with very divided lines. The reality is that ‘getting it right in-camera’ is an important stage in getting images of good technical quality.
If we look at film you essentially have two media types, positive and negative. I am not going to be considering the earlier processes such as salt, cyanotype, or gum processes. There is also the choice of colour or monochrome. Much of the film used was negative film. Film that is processed and then used to shine light through to expose a piece of printing paper. Positive film produces slides or transparencies that are projected. The dynamic range of positive films is nothing like as wide as digital and. If the exposure is out by more than 1/3 stop it will not be acceptable.
When developing colour film there are few ways to change the negative and you have to process the whole film that way. With black and white film it is another matter. Different developers, concentrations and times will give different tonality, contrast, sharpness and grain. At the printing stage dodging and burning would frequently be used to selectively lighten or darken areas. With traditional monochrome prints you can also use ‘Liquid light’ to lighten parts of the final print. The print can also be toned with a variety of chemicals, including gold
Positive film produces slides or transparencies that are projected. The dynamic range of positive films is nothing like as wide as digital and is also less than negative film. If the exposure is out by more than 1/3 stop it will not be acceptable. At the processing stage the only variation that is used is to cross-process the film ( use the C41 negative developing process instead of the E6 positive developing process ). For colour images you had 2 choices, daylight or tungsten ( ignoring infrared). If you use negative film then any slight deviation and the lab can sort out the colour with their filtration at the printing stage. With positive / slide film you need to gel the lights or the lens to correct any colour problems.
Both positive and negative films are able to be retouched. Adding density with a pencil to part of a monochrome negative to lighten the area in the print is one technique. To lighten the negative ‘Liquid light’ can be used and to remove things a scalpel can be used. All of these require a high skill level and there is no going back, any change you make is permanent. If there was a fly-away hair you knew it would take hours of a very expensive retoucher to remove it. Remember, the person can be working on an image area of 36mm by 24mm, think of how small the hair will be within that.
So what has all of this got to do with ‘getting it right in-camera’ ?. Well, if you used slides / positive film your exposure had to be within a third of a stop, your white balance / colour needs to be correct, your lighting has to be controlled within the limited dynamic range of the film and the framing and composition has to be right. With film people got used to the simple fact that getting things correct at the start saved a lot of time later if your error was able to be corrected.
Why is this so important in the digital age ?.
Essentially, if you are looking for absolute quality, nothing has changed. If you are looking to minimise your post-processing, post-production and retouching time, nothing has changed. The closer each exposure is to your desired endpoint the higher quality your final output can be and the cheaper it is to get there because of the saved time.
The social-media, and even face-to-face discussions / arguments generally sees two extremes / ideologies / ‘camps’.
On one side we have the ‘I get it right in camera’ as a euphemism for ‘I cannot be bothered with doing anything with my images once I’ve taken them’ or ‘my digital skills aren’t very good so I do not do very much to them afterwards.
On the other side we have the ‘I fix it in ‘Photoshop tm’ brigade’ as a euphemism for ‘I cannot be bothered to get the exposure. Lighting and colour right when taking the photos’ or ‘I do not have the skills to get the exposure, lighting and colour right when taking the photos’.
Both of these groups of people are hiding a weakness behind a slogan and doing so at the cost of the absolute technical quality that is available from their images.
Even in the digital age of photography, getting it right in camera is very important if quality of output is to be optimised. Similarly, optimising your processing workflow is also important in order to preserve the quality in the original image and, where appropriate, enhance it.
Some of the facts that the ‘I’ll fix it in Photoshop’ brigade ignore:
Exposure / lighting
If your exposure and / or lighting are out then absolute quality is compromised. Recovering shadow details introduces noise and colour shifts in those areas. Recovering mildly blown highlights introduces artifacts and colour shifts.
White Balance
If you are using JPEG files, correcting the white balance in post means you will lose a lot of quality information. If you are using raw files and chimping or using the histogram to work out your exposure then an incorrect white balance can give you problems.
Getting these basic technical aspects that are core photography skills correct requires very little time. Not bothering to get them right costs you time an WILL impact on the maximum technical quality your photography will have.
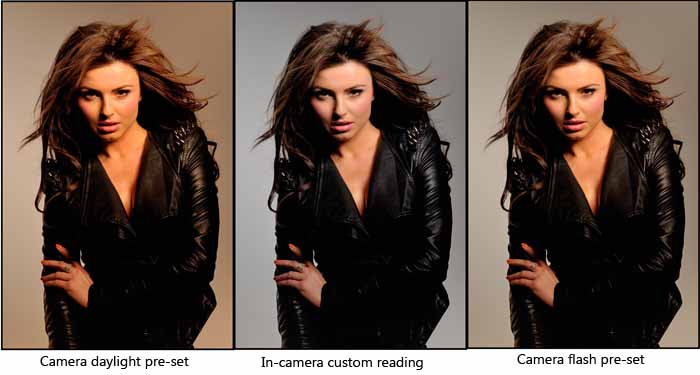
In a controlled situation, indoors or outdoors, white balance setting is as basic as using a white balance target to generate an in-camera custom reading and / or to sample in the post-processing part of the post-capture workflow ( * see footnote ). I use a Lastolite Ezybalance target for the in-camera reading and an Expobalance exposure to both act as a post-process backup of the in-camera custom reading and to check the white and black points in the exposure. Sometimes interpreting the light meter readings will tell you something different from the actual exposure. I’ll also include a Colour checker passport photograph to both be able to build a colour profile for that light / lens / camera combination and to use controlled white balance shifts. Doing this as a routine takes very little time and is repeated for each lighting setup.
Digital photography has opened up photography as an interest or hobby to many more people. Because it makes everything appear to be so easy, particularly auto-everything, many people are not aware of basic foundation skills that can have a significant impact on the quality achievable. Some people are aware of some of these skills but are willing to compromise their quality by being too lazy or un-concerned to ‘get them right’.
If your photographer isn’t serious about sorting out the technical basics, how serious or capable are they going to be with the other aspects of producing a quality image ?.
Some people are great digital artists or are willing to spend a lot of time post-capture remedying their earlier mistakes. At some point they might realise how ‘getting it right in-camera’ will further improve the technical quality of their images and how much more time they would have for actually taking photographs.
*Post-capture workflow:
Edit ➡ post-process ➡ retouch ➡ post-production workflow. Note that editing, as in selecting the images, is just one part of the post-capture workflow. ‘Editing’ should not be used as a catch-all for the post-capture workflow, it is just one part of it.